Updated SSD1306xLED library, fixes, compatibility with SSD1315 and more

SSD1306xLED Testing

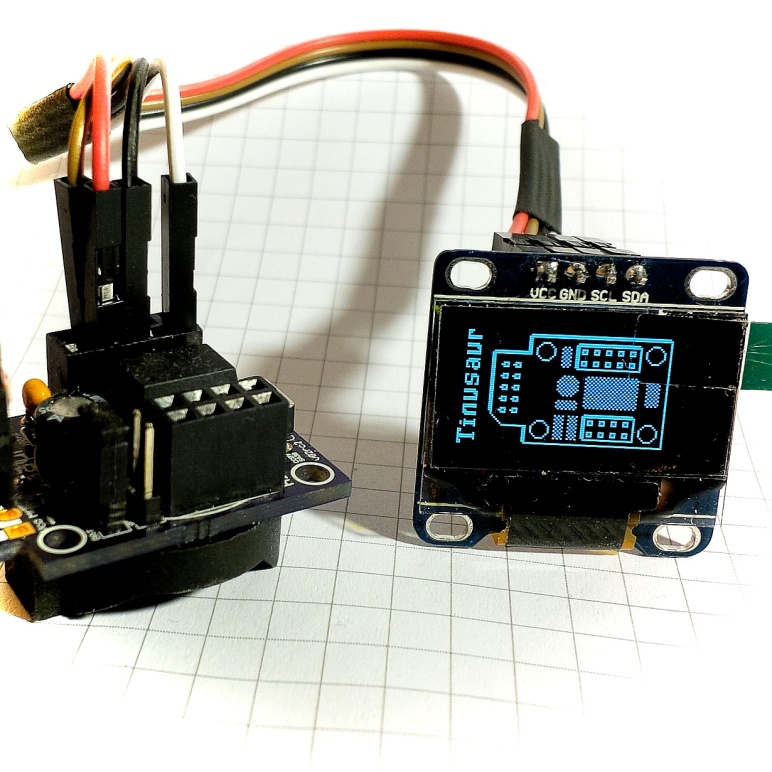
Our SSD1306xLED library works well with the SSD1306 displays, it is small as binary code and is very fast.

But, there was a problem …

Several months ago we ordered some displays from the Far East and we expected them to work just fine. Unfortunately, they did not. And the problem was not in our library but with the chips. Instead of SSD1306, it seems they put the not that well known SSD1315 OLED display controller. We found that out by looking closely at the PCB, beneath the LCD glass plate.

ssd1306xled testing
SSD1315 OLED display controller

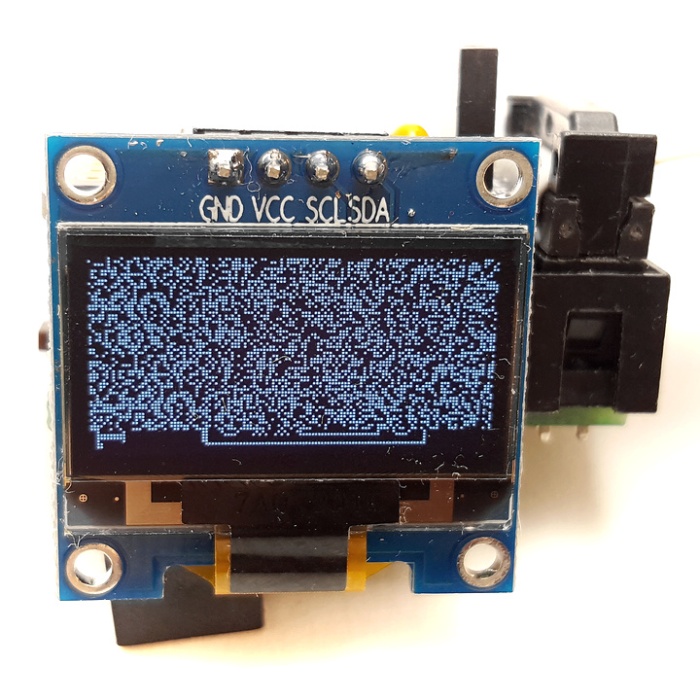
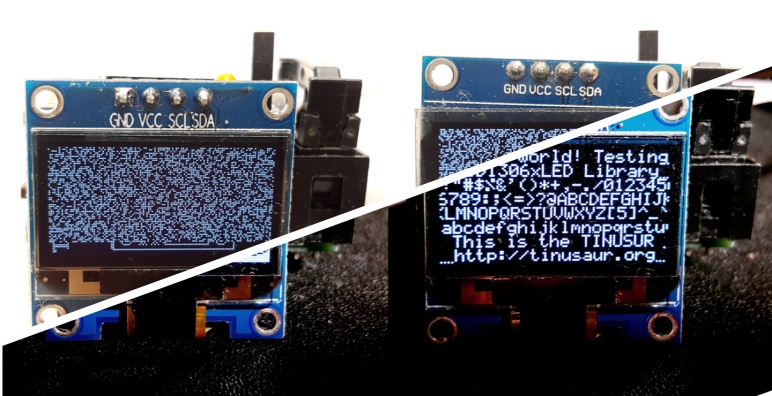
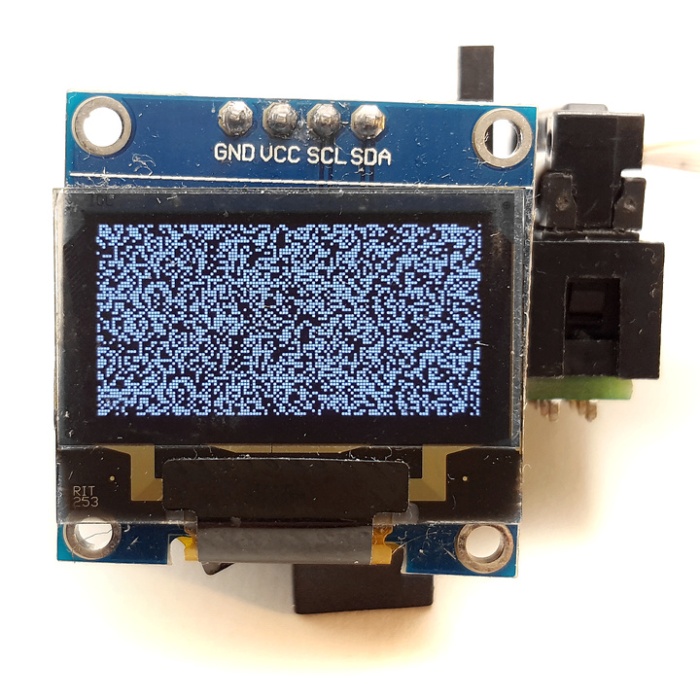
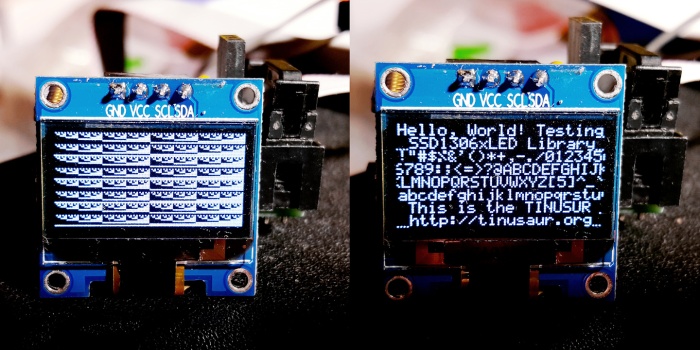
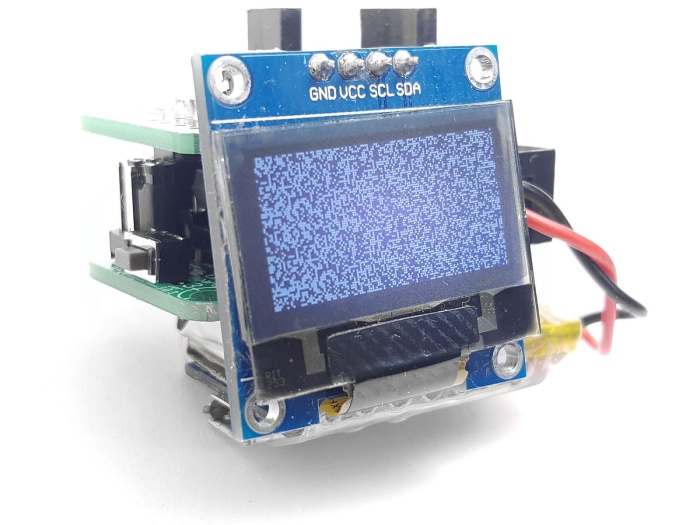
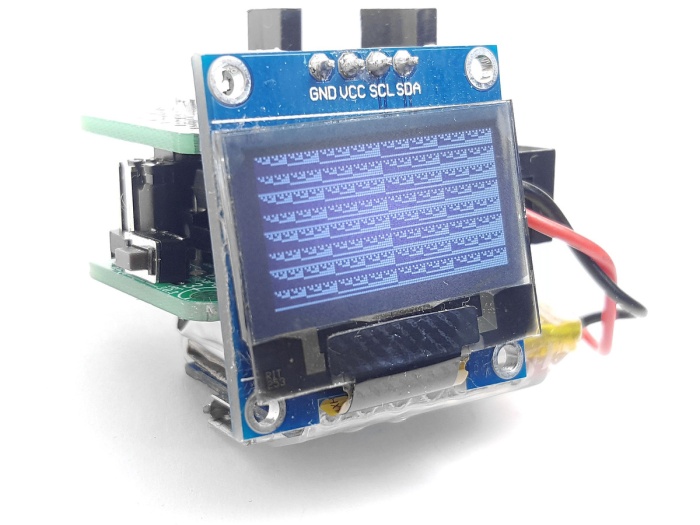
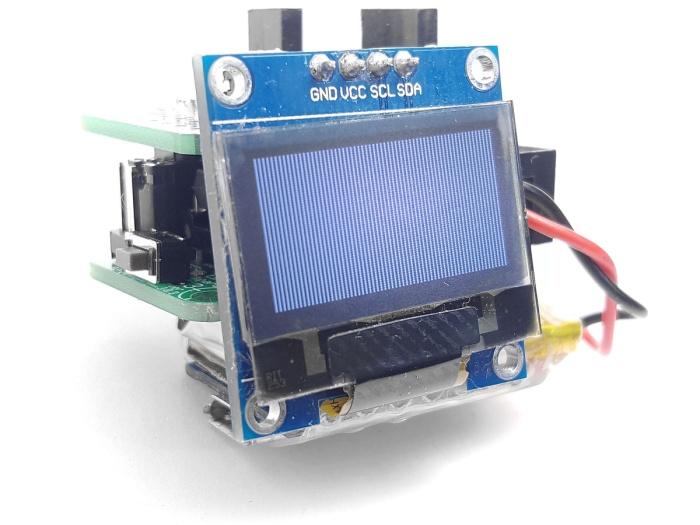
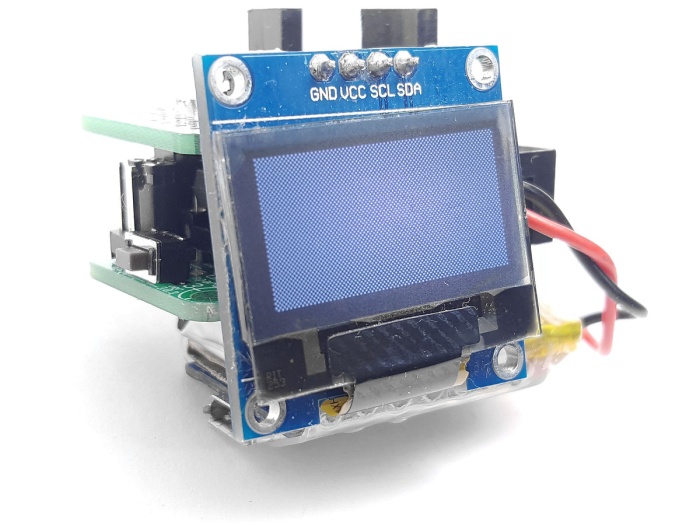
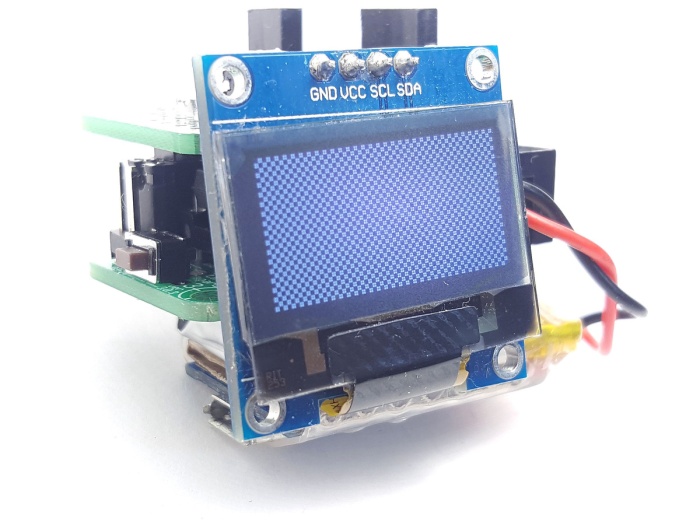
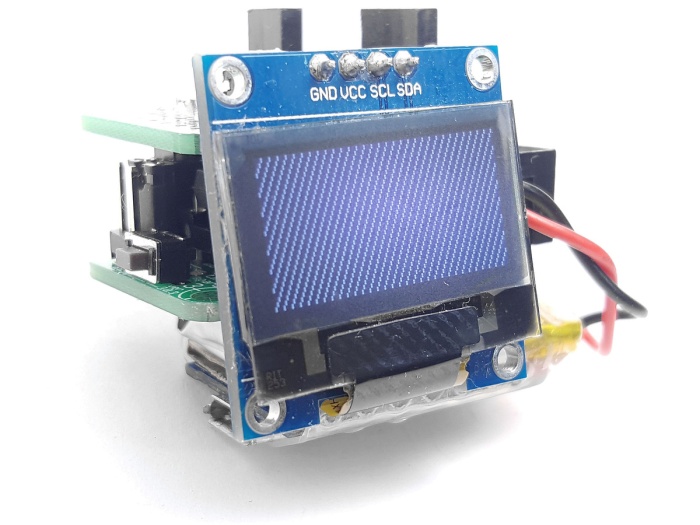
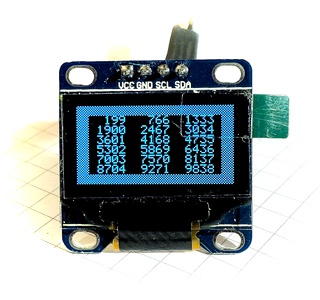
The testing script was producing the result shown in the picture. Note the bottom lines – they were not redrawn, or not always, at least.

On another display that we’ve got earlier, a few years ago, and that was using the SSD1306 controller the picture was looking good.

SSD1306xLED Testing
SSD1306 OLED display controller

Apparently, the problem was with the display controller. Further experiments proved that.

What made it worse for us was that we’ve discovered that from about a hundred display modules we’ve ordered recently half seemed not compatible with our code. We couldn’t even figure out what exactly was the OLED controller on those modules –
SSD1306 as stated in the description where we bought them, or the SSD1315 looking at the testing scripts results. So, we decided to just fix the problem for both kinds of chips. Easy to say it than to do it.

First attempt

2 months ago. We played with the timing and the speed of the data sent to the modules. Tried a few other things, like reordering the commands sent while drawing. We even moved some of the I2C specific code to a separate library to isolate the potential problems and try to fix the issue. No luck.

Second attempt

2 days ago. We decided to re-do the initialization sequence for the OLED controller. These are the commands that we send to the chip before we start drawing things on the display. We read, again, the Solomon Systech PDF file about the SSD1306 controller – the so-called datasheet. There was a half-baked algorithm of how to initialize the chip. Also, looked at several other libraries to see how they do it. Actually, the “Adafruit_SSD1306.cpp” was a really good example so we used some know-how from it.

Wrote the code. Tested it. And, it worked!

Done!

SSD1306xLED Testing
SSD1306xLED Testing

Some optimizations

There were a couple of TO-DO’s in the source code for the optimization of multiplication by a constant. That could be easily converted to a combination of 1 or more left-bitwise-shift and additions.

void ssd1306tx_char(char ch) {
  uint8_t c = ch - 32; // Convert ASCII code to font data index.
  ssd1306_start_data();
  for (uint8_t i = 0; i < 6; i++) {
    ssd1306_data_byte(pgm_read_byte(&ssd1306tx_font_src[c * 6 + i]));
  }
  ssd1306_stop();
}

We combined the c = ch – 32 and the c * 6 + i and optimized the entire expression.

void ssd1306tx_char(char ch) {
  uint16_t j = (ch << 2) + (ch << 1) - 192;
  ssd1306_start_data();
  for (uint8_t i = 0; i < 6; i++) {
    ssd1306_data_byte(pgm_read_byte(&ssd1306tx_font_src[j + i]));
  }
  ssd1306_stop();
}

That saved us about 30 bytes of binary code and it is probably a bit faster than the multiplication with a subroutine.

We did something similar for the void ssd1306tx_stringxy(const uint8_t *fron_src, uint8_t x, uint8_t y, const char s[]); function but without the left-bitwise-shift as the compiler optimizes the very well the multiplication with numbers that are powers of 2, i.e. 2, 4, 8, etc. In our case – 16. That saved us another 20 bytes of binary code and probably gained some speed.

So, we saved about 50 bytes of machine code and gained some speed. That might not look that much but for a microcontroller with 4096 bytes for code and 1 or 8 MHz CPU that’s about 1.2% less memory usage. And, our library is now a bit faster.

Resources

There are more functions in the SSD1306xLED library such as for printing text and numbers on the screen and drawing images but that will be subject of another article.

The official page of the library (will be):
https://tinusaur.org/software/libraries/ssd1306xled/

Source code is available at:
https://bitbucket.org/tinusaur/ssd1306xled/src

C Library for SSD1306 OLED Display and ATtiny85

C Library for SSD1306 OLED Display and ATtiny85

It isn’t hard to get one of those OLED displays from eBay or another place. They are usually controlled by SSD1306 chip – one of the most popular. Such displays could be used for a number of things – from just learning to control them and showing some text/numbers/graphics, display sensors’ data or even creating a small game.

SSD1306 OLED Display

Back in 2014, we wrote a small library for the ATtiny85 microcontroller to work with such displays and we called it SSD1306xLED after the name of the controlling chip for the display.

Here is a link to check what’s for sale now:
http://www.ebay.com / OLED 128 64

IMPORTANT DISCLAIMERS:

  1. This library works with the display modules that use the I2C protocol. This is important to know since there are other similar displays that use the same SSD1306 controller but communicate over the SPI interface. In that case, our library will not work. We use, in most cases, the modules with 4 pins – GND, Vcc, SCL, SDA.
  2. Although using the I2C interface, our SSD1306xLED library does not implement the I2C protocol but just a subset of it enough to accomplish the task of sending commands and data to the display. This comes with 2 great advantages: (1) it is super fast; (2) is super small – more details about those characteristics will be outlined below.

The library is, of course, open source and all the software is available at https://bitbucket.org/tinusaur/ssd1306xled/

The I2CSW sub-library

This is a small sub-library that implements a subset of the I2C protocols that is necessary to send some commands and data out. I2CSW stands for “I2C Simple Writer” and as its name implies it only writes out.

There are 2 macros to sent the SCL and SDA wires to high and to low, or, or 1 and 0.
I2CSW_HIGH(PORT)
I2CSW_LOW(PORT)

Then, there are 3 low-level functions:
— void i2csw_start(void);
— void i2csw_stop(void);
— void i2csw_byte(uint8_t byte);

The i2csw_start function sets the SCL and SDA pins as output and the “start” condition. In other words, it lets the devices connected to the microcontroller know that we are about to send something out.

The i2csw_stop function sets the “stop” condition. This indicates that we have finished with sending the data. It also set the SDA pin as input so it won’t keep the SDA line at HIGH all the time.

SSD1306 I2C Start and Stop Condition

The i2csw_byte function sends one byte of data out. It is used to send commands and data to the I2C devices – the display in our case.

SSD1306 I2C Acknowledgment Condition

NOTE: The I2CSW library does not handle the acknowledgment condition.

The ssd1306 core functions

There are 4 core functions in the library at the moment:
— void ssd1306_start_command(void);
— void ssd1306_start_data(void);
— void ssd1306_data_byte(uint8_t);
— void ssd1306_stop(void);

The ssd1306_start_command function indicates to the connected I2C devices that we’re about to send commands. This is used to configure the controller o to set some parameters such as the current position on the display.

The ssd1306_start_data function indicates to the connected I2C devices that we’re about to send some data. This is used to send some data to the display controller – like bitmaps or text.

The ssd1306_data_byte function sends 2 bytes of data to the display controller. That is used for both commands and data.

The ssd1306_stop function indicates that we have finished transmitting data.

SSD1306 I2C Write data

The ssd1306 supplementary functions

These are convenience functions:
— void ssd1306_init(void);
— void ssd1306_setpos(uint8_t x, uint8_t y);
— void ssd1306_fill4(uint8_t, uint8_t, uint8_t, uint8_t);

The ssd1306_init function sends a sequence of commands that will initialize the display controller so it will work the way we expect.

The ssd1306_setpos function sets the current position on the display. Sending data after this command will display it at that position.

From the documentation:

Horizontal addressing mode (A[1:0]=00b)

In horizontal addressing mode, after the display RAM is read/written, the column address pointer is increased automatically by 1. If the column address pointer reaches column end address, the column address pointer is reset to column start address and page address pointer is increased by 1. The sequence of movement of the page and column address point for horizontal addressing mode is shown in Figure 10-3. When both column and page address pointers reach the end address, the pointers are reset to column start address and page start address (Dotted line in Figure 10-3.)

Solomon Systech Apr 2008 P 42/59 Rev 1.1 SSD1306
SSD1306 I2C Horizontal addressing mode

The ssd1306_fill4 function fills out the screen with the 4 bytes specified as parameters. The reason for 4 bytes is that it is convenient for filling out with patterns.

There are 3 other functions derived from the ssd1306_fill4 function:
ssd1306_clear() – clears the screen, i.e. fills it out with “0”.
ssd1306_fill(p) – fills the display with the specified byte.
ssd1306_fill2(p1, p2) – fills the display with the 2 specified bytes.

The testing scripts demonstrate the purpose and usage of those functions.

The testing in the “ssd1306xled_test1” folder

Source code at https://bitbucket.org/tinusaur/ssd1306xled/src/default/ssd1306xled_test1/main.c

This testing script demonstrates the use of the functions in the library.

The first section fills out the screen with random values using a Linear congruential generator.

SSD1306 Library SSD1306xLED Testing Script

The second section fills out the screen with a sequential number that creates some patterns on the screen.

SSD1306 Library SSD1306xLED Testing Script

The next section fills out the screen line by line.

SSD1306 Library SSD1306xLED Testing Script

The last section fills out the screen with various patterns.

More functions …

There are more functions in the SSD1306xLED library such as for printing text and numbers on the screen and drawing images but that will be subject of another article.

Please, share your thoughts!

Printing Decimal Numbers on SSD1306 OLED Display Using the SSD1306xLED Library

Tinusaur SSD1306XLED SSD1306 OLED Llibary

UPDATE: Please, check the most recent post about this library at https://tinusaur.org/tag/ssd1306xled

After playing for awhile with that SSD1306 OLED display I decided to add few more things to the SSD1306xLED library and the ability to print numbers seamed to be an important one.

Tinusaur SSD1306xLED ATtiny85 SSD1306 OLDEThere is already a function in the library that outputs strings so I needed only the conversion from int to a decimal string. So I used another function usint2decascii that I previously wrote for another project OWOWOD which code, in turn, I borrowed from a third project LCDDDD – an LCD Direct Drawing Driver for PCD8544 based displays such as Nokia 3310 LCD. The weird LCDDDD name comes from the fact that it outputs the data directly to the LCD instead of storing it into a buffer first and then periodically outputting it to the LCD – this is unlike most of the popular LCD drivers.

Here is the main function definition …

uint8_t usint2decascii(uint16_t num, char* buffer)

The function requires a small buffer to store the result. Since the largest number is 65535 – that is 0xFFFF in hex, 5+1 bytes are needed for that buffer.

For convenience, there are 2 functions for direct printing of numbers. Below is their implementation – it’s very simple:

#define USINT2DECASCII_MAX_DIGITS 5

char ssd1306_numdec_buffer[USINT2DECASCII_MAX_DIGITS + 1];

void ssd1306_numdec_font6x8(uint16_t num) {
  ssd1306_numdec_buffer[USINT2DECASCII_MAX_DIGITS] = '\0';
  uint8_t digits = usint2decascii(num, ssd1306_numdec_buffer);
  ssd1306_string_font6x8(ssd1306_numdec_buffer + digits);
}

void ssd1306_numdecp_font6x8(uint16_t num) {
  ssd1306_numdec_buffer[USINT2DECASCII_MAX_DIGITS] = '\0';
  usint2decascii(num, ssd1306_numdec_buffer);
  ssd1306_string_font6x8(ssd1306_numdec_buffer);
}

The ssd1306_numdec_font6x8 only prints the number while ssd1306_numdecp_font6x8 prints numbers the same way but right-aligned and 5-digit padded.

Printing numbers is as simple as this …

  ssd1306_setpos(20, 4);
  ssd1306_numdecp_font6x8(12345);

Here is a little more complicated example …

ssd1306_setpos(40, 3);
ssd1306_string_font6x8("a=");
ssd1306_numdecp_font6x8(0xFA32); // dec: 64050
ssd1306_setpos(40, 4);
ssd1306_string_font6x8("b=");
ssd1306_numdecp_font6x8(0x05CD); // dec: 1485

ssd1306xled sample screen

It prints “a=”, “b=” and then their values. Both numbers are right-aligned and left-padded with up to 4 spaces.

The latest test program in SSD1306xLED includes examples of how to use the ssd1306_numdec_font6x8 and the ssd1306_numdecp_font6x8 functions.

The SSD1306xLED library is at SSD1306xLED page.

The source code of the SSD1306xLED is available at https://bitbucket.org/tinusaur/ssd1306xled

The source code of the TinyAVRLib is available at https://bitbucket.org/tinusaur/tinyavrlib

C Library for ATtiny85 to Work with SSD1306 Controlled OLED Display

UPDATE: Please check the most recent post about this library at https://tinusaur.org/tag/ssd1306xled

I recently bought an OLED display 128×64 from eBay (http://www.ebay.com/sch/i.html?_nkw=OLED+128) – very inexpensive (about 4 euro) but when I finally received it I was surprised to see how small it was – I was expecting something that looked more like the Nokia 3310 LCD. So I thought – this is perfect for the Tinusaur Project. The 128×64 OLED is controlled by an SSD1306 circuit and could be interfaced over I²C. The first challenge that I faced was that all existing libraries that I found were for Arduino boards … and I wrote my own based, of course, on existing code – the SSD1306xLED library.

SSD1306xLED library for OLED/PLED 128x64

SSD1306xLED is a C library for working with the SSD1306 display driver to control dot matrix OLED/PLED 128×64 displays. It is intended to be used with the Tinusaur board but should also work with any other board based on ATtiny85 or similar microcontroller – ATtiny45/ATtiny25, even ATtiny13.

The code could be divided into 3 pieces: (1) communication over I²C with the SSD1306; (2) sending graphical commands to the display; (3) high-level functions such as printing characters.

The I²C communication part is based on modified IIC_wtihout_ACK library that is available on the Internet but its original website (http://www.14blog.com/archives/1358) is no longer functional. Basically, it made it work on ATtiny85 and Tinusaur.

The SSD1306xLED library still needs work and improvements.

The main location for the library is SSD1306xLED page.

The source code along with very simple example is available on Bitbucket at this address: https://bitbucket.org/tinusaur/ssd1306xled